In the world of tracking and GDPR it’s important to know that users’ consent must always be obtained first and foremost. Shopify offers an easy setup and native integration when it comes to connecting your analytics and marketing tools like Google Analytics, Facebook, Google Ads, Pinterest.
By connecting these tools to your store Shopify will automatically track events like View Product, Add to Cart, Begin Checkout and Purchase via their native integration. If you use a cookie consent tool, like GDPR/CCPA + Cookie Management, then it automatically blocks and fires the tags based on the user’s preferences.
Shopify’s documentation explains how to add GTM to your website, however it doesn’t cover the order status page or connecting this to a cookie consent banner
This is great functionality but what if you want to add your own custom events and conversions or connect additional tools that aren’t supported by Shopify, like Google Analytics 4? Then you’ll want to connect Google Tag Manager (GTM), connect the cookie consent to that and start creating your tags.
Shopify’s documentation explains how to add GTM to your website, which is helpful, however it doesn’t cover the order status page or connecting this to a cookie consent banner. This article will explain what is required in order to set up your custom GDPR tracking functionality on your Shopify store.
The only caveat is that without Shopify Plus, GTM won’t load. This means your additional tags or events won’t be able to fire on the checkout pages. This article will go over best practices for integrating a cookie consent banner from Shopify to Google Tag Manager.
What you need to integrate a cookie consent banner from Shopify to Google Tag Manager
Here’s what you’ll need to have in advance before starting to integrate the consent banner.
- Shopify
- GDPR/CCPA + Cookie Management (Cookie Consent Tool)
- Google Tag Manager (GTM) – this should already be installed in your theme. If not follow Shopify’s instructions here.
What needs to be setup in Shopify and Google Tag Manager
- Install and configure Cookie Consent Tool
- Add GTM and additional script to the Order Status page
- Understand what is sent to Data Layer
- Create a variable to store the status
- Create variables to store the cookie category settings
- Create a trigger to fire when cookie consent banner event is loaded
- Create blocking/exception triggers
- Bonus: Shopify Marketing Plugins
1. Setting up the cookie banner in Shopify
- To install and configure the cookie consent tool, login to your store and install GDPR/CCPA + Cookie Management by iSenseLabs
- Once installed navigate to Apps > GDPR/CCPA + Cookie Management > Global Settings
- Under Show Cookie Consent Bar select Enable
- Under Enable For Specific Regions select the one that makes sense for your store. I recommend setting it to Enable For EU/EEA + Brazil & California Visitors (GDPR & CCPA). This makes sure regardless of who visits your store compliance is followed.
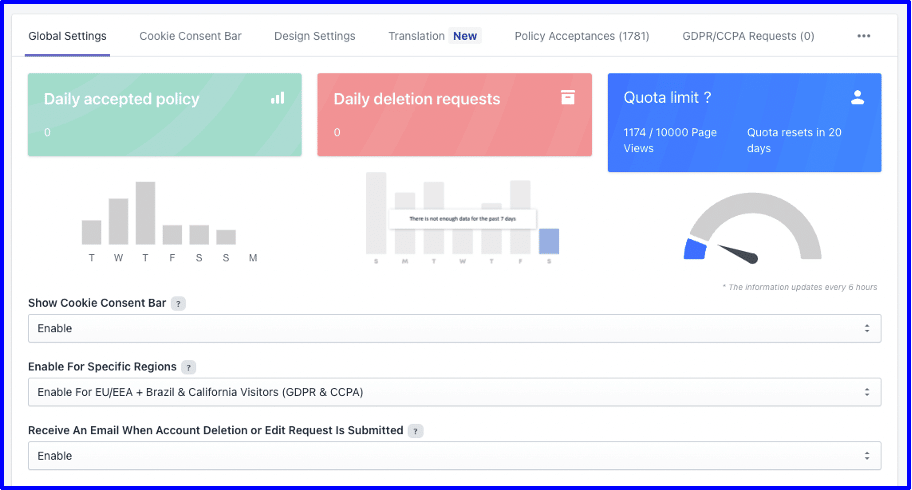
- Navigate to Apps > GDPR/CCPA + Cookie Management > Cookie Consent Bar
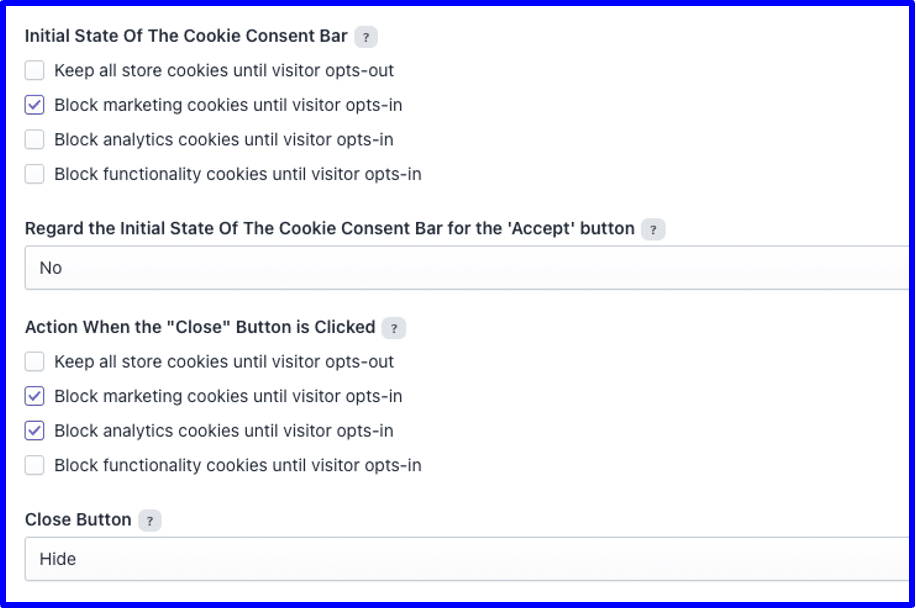
Here you have the options to edit the text, add the link privacy policy links and configure the behaviour of the banner. Most of this is straightforward but I will explain configuring banner behaviour.
- Initial State Of The Cookie Consent Bar controls which cookies you want to block or allow before the visitor interacts with your store. For GDPR compliance, marketing and analytics should be blocked. Depending on which functionality cookies you should determine if these need to be blocked or not.
- Regard the Initial State… sets if the ‘Accept’ button should accept all cookies or revert to what was selected under Initial State Of The Cookie Consent Bar. Set this to No as we want this action to allow all cookies.
- Action When the “Close” Button is Clicked controls which cookies you want to block or allow when the visitor clicks it “Close”.
Under Close Button you can decide to hide or show the Close button.
2. Add Google Tag Manager and additional script to the Order Status page
As well as adding GTM tracking to your theme you will need to add it to the order status page to ensure that your tags are loaded after a purchase is made.
- Navigate to Settings > Checkout
- Scroll to Additional scripts > Order status page
- Add the below code:
{% if first_time_accessed %}


<!-- Google Tag Manager -->
<script>(function(w,d,s,l,i){w[l]=w[l]||[];w[l].push({'gtm.start':new Date().getTime(),event:'gtm.js'});var f=d.getElementsByTagName(s)[0],j=d.createElement(s),dl=l!='dataLayer'?'&l='+l:'';j.async=true;j.src='https://www.googletagmanager.com/gtm.js?id='+i+dl;f.parentNode.insertBefore(j,f);})(window,document,'script','dataLayer','GTM-P6KN97R');</script>
<!-- End Google Tag Manager -->


<!-- Event snippet for Order conversion page -->
<script>
    gtag("event", "conversion", {
    send_to: "GTM-P6KN97R",
    value: parseFloat("{{ checkout.total_price }}") / 100.0,
    currency: "{{ checkout.currency }}",
    transaction_id: "{{ checkout.order_id }}",
    });
</script>


{% endif %}
3. Understand what is sent to the Data Layer
By default GDPR/CCPA + Cookie Management pushes the category settings to the data layer. Below are the different states depending on the visitors region and if the consent banner has been interacted with or not:
- Visitor inside GDPR region – on load
- Visitor inside GDPR region – after accepting
- Visitor inside GDPR region – after declining
- Visitor outside of GDPR region
Visitor inside GDPR region – on load:
{
	event: "consent_status",
	timestamp: null,
	status: "decline",
	categories: [
		{
			necessary: true,
			analytics: false,
			marketing: false,
			functionality: true
		}
	]
}
Visitor inside GDPR region – after accepting:
{
	event: "consent_status",
	timestamp: null,
	status: "allow",
	categories: [
		{
			necessary: true,
			analytics: true,
			marketing: false,
			functionality: false
		}
	]
}
Visitor inside GDPR region – after declining:
{
	event: "consent_status",
	timestamp: null,
	status: "decline",
	categories: [
		{
			necessary: true,
			analytics: false,
			marketing: false,
			functionality: false
		}
	]
}
Visitor outside of GDPR region:
The consent banner isn’t displayed in this case.
{
    event: "consent_status",
	timestamp: null,
	status: "non_gdpr"
}
The important values here are:
- event – we’ll use this to fire tags
- status and the categories object – we’ll capture these in the next steps
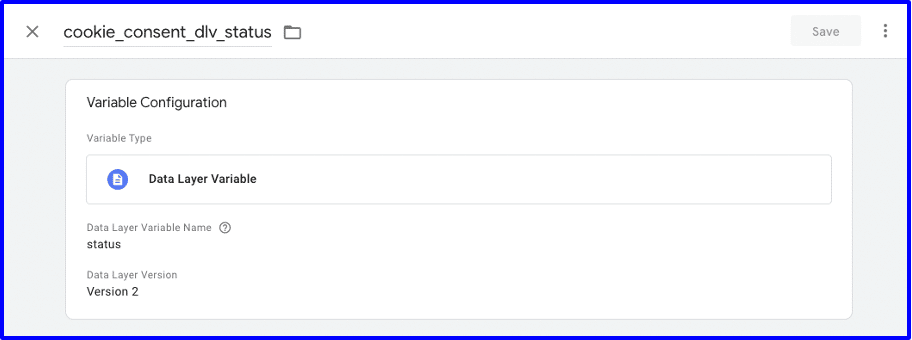
4. Create a variable to store the status
- In GTM create a variable using Data Layer Variable variable type
- Name it cookie_consent_dlv_status
- Under Data Layer Variable Name enter status.
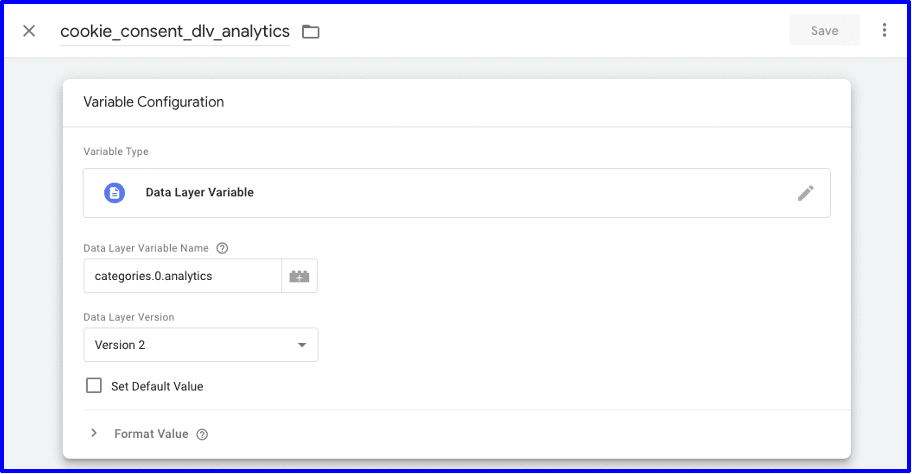
5. Create variables to store the cookie category settings
- Create a variable using Data Layer Variable variable type
- Name it cookie_consent_dlv_analytics
- Under Data Layer Variable Name enter categories.0.analytics
Repeat this step for marketing and functionality.
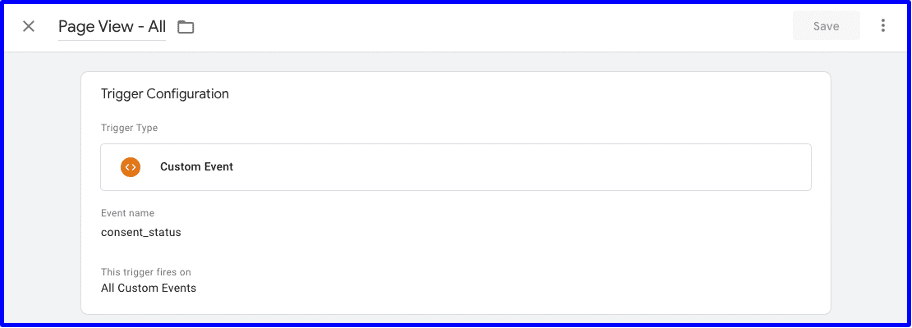
6. Create a trigger to fire when cookie consent banner event is loaded
This trigger will be used as a page view and will fire when the consent banner fires consent_status.
- Create a trigger using Custom Event trigger type
- Name it Page View – All
Under Event name enter consent_status.
Get us on board
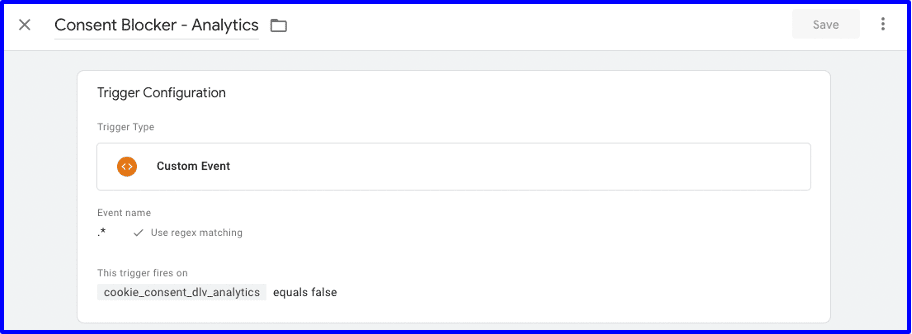
7. Create blocking/exception triggers
- Create a trigger using Custom Event trigger type
- Name it Consent Blocker – Analytics
- In Event name enter .* (this is regular expression for any/all)
- Tick Use regex matching
- Under firing criteria enter cookie_consent_dlv_analytics equals false
- Repeat these steps for marketing and functionality.
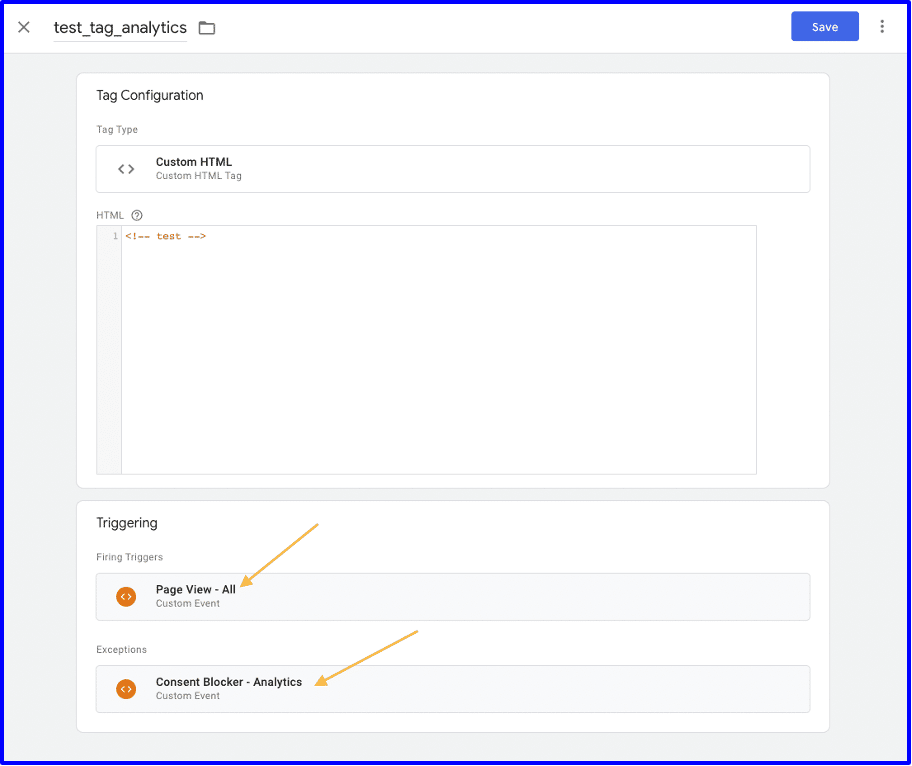
- When setting up your tags add the above triggers under Exceptions like the example below.
Shopify Marketing & Social Media Plugins
Facebook, Pinterest and Google Ads can all be connected via plugins. Facebook and Pinterest don’t support advanced match or custom events but these can be added later in GTM if needed.
Wrapping up
Now that you’ve successfully connected your store’s cookie consent with GTM you can start adding your tags and events as you need.
For the most part Shopify fits the needs of Marketing teams by connecting to the most common marketing and analytics tools via native integration. But in cases where you want to track custom conversions or have additional tools integrated it can require some additional steps and planning, like the steps outlined above. While the process isn’t overly difficult it does require a number of steps and can require waiting on multiple teams: developers to implement the GTM code and legal to sign off on the cookie consent content and process.
Have you already connected your Shopify website to Google Merchant Center? This blog post will help you with that and give you a workaround in case you need to quickly update your feed after a change. For Hubspot fans, we’ve published a similar guide on how to set up the double opt-in on Hubspot.
Did something not quite go right or do you have questions about your tracking setup? Then get in touch with us to see how we can help you get the most out of your Shopify store tracking.
We’re Tracking specialists

